
How to Teach Your First Calligraphy Workshop in 2026 (The Ultimate Step-By-Step Guide)
Where do you even start with hosting your first brush lettering calligraphy workshop?
This blog post is the ultimate step-by-step guide if you want to teach a calligraphy workshop to beginners in your city.
If you’re deciding between teaching pointed pen and brush lettering, I’d start off with brush lettering first—it’s easier for beginners to learn with a brush pen, and you don’t get any messy ink spills.
How do you know you are good enough to teach?
A lot of calligraphers shy away from teaching a workshop because they think they aren’t good enough.
When it comes to this question, I think of it in two ways:
1. CALLIGRAPHY SKILL LEVEL: HOW DO YOU KNOW YOU ARE GOOD ENOUGH TO TEACH IN TERMS OF YOUR SKILL LEVEL?
You don’t have to be a super advanced calligrapher to teach others.
You’re teaching beginners anyways, right? If you are comfortable with brush lettering and know the basics of how to form letters and words, I’d say go for it!
I have taught over 50 brush lettering workshops and I don’t know how to flourish.
If someone asks you a question that you don’t know, it’s totally fine to be honest with them and say you don’t know.
2. TEACHING SKILLS: HOW DO YOU KNOW YOU ARE A GOOD ENOUGH TO BE A TEACHER AND INSTRUCTING OTHERS?
The most important question here to ask yourself is: “To what extent am I comfortable doing public speaking in front of strangers?”
If you’re generally comfortable meeting and talking with new people, you’re already halfway there.
I remember when I hosted my first workshop, I was soooo nervous. But the more I taught, the more I got comfortable.
If you’re nervous teaching strangers, start small: Start teaching your friends first and host a beta workshop…

What is a beta calligraphy workshop?
The word beta is short for beta test.
A BETA WORKSHOP IS A TESTER WORKSHOP, WHERE YOU TRY OUT TEACHING AND COLLECT FEEDBACK.
To give you an idea, the first calligraphy workshop I ever taught was $15 per person, 1.5 hours, and mostly it was my friends who came. At the end of the workshop, I saved a few minutes to ask the them if they had any feedback for me.
You can even tell your participants that this is your first ever workshop so you don’t feel as nervous since they will now expect you to stumble on a words a bit.

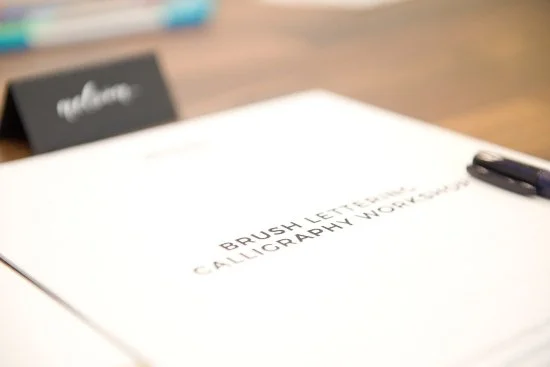
How to make your own worksheets?
One of the biggest challenges calligraphers find when hosting their first calligraphy workshop is how to make worksheets.
FIRST, SHOULD YOU MAKE YOUR OWN WORKSHEETS?
I would 100% say yes. Why is that? Even if you found a calligrapher who licensed out their worksheets to other calligraphers—trust me, even finding that is hard—you won’t be entirely comfortable teaching with someone’s else’s material.
You should make your own worksheets because you yourself are developing the system for your students to learn.
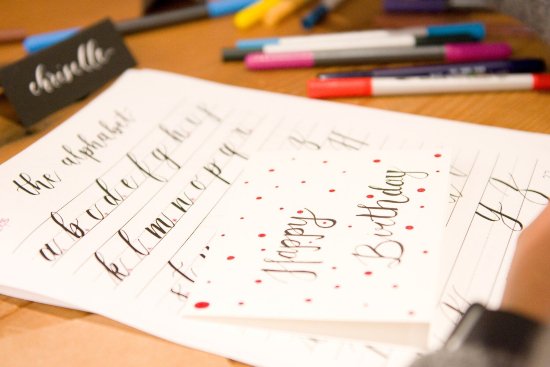
GENERALLY, PEOPLE LEARN BRUSH LETTERING IN A 3-STEP PROCESS.
Learn the basic strokes
Learn how to form letters from the basic strokes
Learn how to connect letters together to form words
So when making worksheets, follow the 3-step process. Make a page on the basic strokes, then make pages of letters, and then have a few pages at the end for words, starting with shorter words and moving on to longer words.
My personal favourite in my worksheets is the word congratulations because it’s so damn long haha!
This is a general guideline on how to make your own worksheets. If you forgot how you learnt calligraphy as a beginner, watch some beginner YouTube videos to see how other people teach.
Now how exactly do you make the worksheets into a physical thing people can use?
There are 3 ways.
1. DO IT BY HAND AND THEN PHOTOCOPY.
Easier and faster, but harder to make revisions after. Print out some blank lines, use your brush pen to do the strokes/letters/words, and then photocopy them for your students.
Obviously, if you make a mistake on a page, you need to re-do the entire page. This is a quick and easy way to make worksheets if you don’t know how to do it digitally.
2. DO IT BY HAND AND THEN DIGITIZE.
This is the way I did my worksheets.
I printed some blank lines, then put a blank page over it so I could form the strokes and letters, making sure I was writing within the lines. Then I got my friend who knows graphic design to help me digitize the worksheets on Adobe Illustrator.
3. DO IT ALL DIGITALLY.
If you have a tablet or iPad, you can do it all digitally. I haven’t tried this, but I’d imagine it’s much easier to get smoother lines.
The first set of worksheets I made were 15 pages. Now, my worksheets are 25 pages long.
It’s up to you if you want to give people space on the actual worksheets themselves to practice, or if you want to do all the strokes, letters and words on a condensed 2-3 pages, and then give blank lines to your students to practice.
Want printable lines for your worksheets? Join my free Facebook group “Calligraphy Business Bosses” to get printable lines for your worksheets. Make sure you answer the 3 questions when you request to join!
How do you find a location for your calligraphy workshop?
This one is the other huge headache for calligraphers wanting to host their first public calligraphy workshop.
If you are hosting a workshop for friends, you can obviously do it at your own house or a friend’s house.
However, if you will have strangers there, I don’t recommend using someone’s home for privacy concerns.
So, if you want to host a public calligraphy workshop in a public space, how do you go about looking for a location?
You have two options, and there are pros and cons to each.

FREE OPTION: ASK A LOCAL CAFE IF YOU CAN RESERVE A BIG TABLE FOR YOUR WORKSHOP OF 7-10 PEOPLE.
Of the 50 public workshops I taught in 2019, all of them were at cafes except for 5 workshops at rented locations.
I approached cafes asking if I can host a paid event there—this is important—you want to make sure the cafe is okay with you charging people for the event.
In return, I told the cafe that I would get everyone to buy a drink or some food when they came, and I would promote the cafe on social media. The 8 cafes I’ve used in Vancouver, Canada, have all been okay with this.
The great thing about using cafes is that you don’t need to worry about rental costs if you have a lower than expected number of attendees.
The downside is that you are limited to the number of people you can teach in one workshop, and depending on the cafe, it might be a little noisy.
Rental options are usually based on hour or by day. Obviously, you need to take the rental cost into consideration when deciding on the price of your workshop.
When you host in a private, rented location, you have all control over the environment—that’s the great thing about renting a place.
The downside is that you incur more costs and you might be stressed if you don’t sell your target number of workshop tickets.
Depending on your city, you can also use This Open Space, a website that helps you find rent-able rooms and spaces for your event.
How to do marketing for a calligraphy workshop?
There are a ton of things you can do for marketing your workshop and selling tickets.
First, where are you going to post your event? Should you post it on your website or on an event ticketing platform?
IF YOU’RE STARTING OUT AND DON’T HAVE A TON OF TRAFFIC ON YOUR WEBSITE, I WOULD POST IT ON AN EVENT TICKETING PLATFORM LIKE EVENTBRITE.
I use Eventbrite for all my public workshops. It’s free and pretty user-friendly. Depending on what country you live in, the platform will be different. Do some research.
No matter what event ticketing platform you use, make sure you add a catchy cover image for your event, and write an engaging event description that will make your ideal audience want to sign up immediately.
Don’t forget your return policy and to add your contact information in case someone has a question!
Once you create an event on your event platform, create the exact same event on Facebook so people in your city can find your event.
I would post the event at least 4 weeks in advance of the workshop for people to see the event and plan accordingly.
Now let’s move on to actually selling tickets. How do you get people to find your event?
Obviously, promote it on all your social channels: Instagram, Facebook, LinkedIn, and to the friend groups you’re part of. I usually make a 10% promo code when I promote it myself.
Genius tip: On Facebook, ask a few friends to click “interested” in your event. This will lead to their friends—whom you don’t know—seeing it on their news feeds. In my Facebook group “Calligraphy Business Bosses”, I have a video training with more genius tips on how to promote your workshops.
I haven’t had much experience with ads before, but if you are finding that your own marketing isn’t enough, then I would look into Instagram and Facebook ads.
In my city—Vancouver, Canada—the majority of people (60-70%) find my Eventbrite event from Google when they search for “calligraphy workshop Vancouver” or “Vancouver calligraphy class”. The other 30-40% is from Instagram and word of mouth, to give you an idea of how people find my workshops.
What do you do if you don’t have enough ticket sales?
If you’re a week away from your workshop, and you only have a few students (under 4), don’t panic! A lot people buy tickets last minute.
Do one last push for ticket sales through your social media.
I’m not a fan of offering discounts of more than 10%, but if there are less than 4 people registered, I will make a 30% or 50% off coupon and post it on my personal Facebook profile for only friends to see. If the public sees that you are constantly offering discounted tickets, they won’t buy the tickets early next time.
What should you include in your kit for each participant?
FOR MY BRUSH LETTERING WORKSHOPS, THIS IS WHAT I GIVE EACH PERSON:
Tombow Fudenosuke hard tip brush pen
Set of worksheets (15-25 pages)
Blank card and envelope
Personalized name card
There are actually many great beginner brush pens. My personal favourite is the Tombow Fudenosuke hard tip brush pen, but I also like the Pentel Touch.
“Okay, Dina, so I’ve got everything I need to host a workshop. But how do I actually teach it?”
Remember, you are hosting an event. Make people feel welcome by greeting them nicely and showing them where they can sit. I usually get everyone to introduce themselves.
Then I move on to explain the brush pen and then we start on the worksheets.
I TEACH THE BASIC STROKES, THEN LETTERS, THEN CONNECTING LETTERS INTO WORDS.
At the end of my workshop, I get my students to make a greeting card so they have a finished product to take home and something they can feel proud of.
Encourage them and make them feel comfortable!
No matter how bad their calligraphy is, don’t laugh—seriously—I’ve had to stop myself from laughing. Keep encouraging and showing them how they can be better.
IN THE END, THE ENTIRE EXPERIENCE OF THEM TAKING A CALLIGRAPHY WORKSHOP IS WHAT THEY WILL REMEMBER.
Of course, it’s great if they get really good at calligraphy. But if you’re positive and cheering them on no matter how good they are, they will feel the same way and hopefully continue to practice at home.
I support calligraphers wanting to host workshops in my free Facebook group “Calligraphy Business Bosses” through live training sessions and resources. Welcome to join here!
I HOPE THIS BLOG POST HAS ENCOURAGED YOU TO HOST YOUR FIRST CALLIGRAPHY WORKSHOP.
I remember being incredibly nervous to host my first workshop because I had only started to learn calligraphy six months prior to that and didn’t feel like a “legit calligrapher”.
As long as you are two steps in front of whoever you’re teaching, then you are an expert to them.
If you’re looking for more resources to host your first calligraphy workshop and you thought this blog post was useful, I’m welcoming you to join my free Facebook group “Calligraphy Business Bosses”, a community of calligraphers supporting each other in building their calligraphy businesses.
Once you join, you’ll get access to the live training video that I did where I go into detail about pricing a workshop, making worksheets, and exactly how I approached cafes for workshop locations. Join now!